Article Contents:
- My PowerShell Prompt Preferences
- Customizing the Prompt function
- Detecting Run As Administrator
- Displaying the Current User
- Displaying the Current Folder
- Creating a “timestamp” for commands
- Querying how long the last command ran
- Displaying the full folder path in the Title Bar
- Bringing it all together
You can personalize the command prompt in PowerShell to suit your preferences. To enhance the usefulness of the command prompt display, many pieces of information can be incorporated. Recently, I customized my command prompt with information that I believe is helpful.
I would like to share with you how I customized my command prompt to display information, such as the current folder and execution of the last command that was run. You can implement my customizations as is, or you can create your own. Follow along and I will show you how I did it, then you will know how to make changes on your own. If you want to head straight to the finished code, just browse to the end of this post.
My PowerShell Prompt Preferences
Have you seen other community people present demos, and you wondered how they got their command prompt to be so tricked out? Yeah, so did I… One day I decided I was going to figure out how to customize my command prompt to my liking. First thing I had to figure was, what did I want to see in my command prompt?
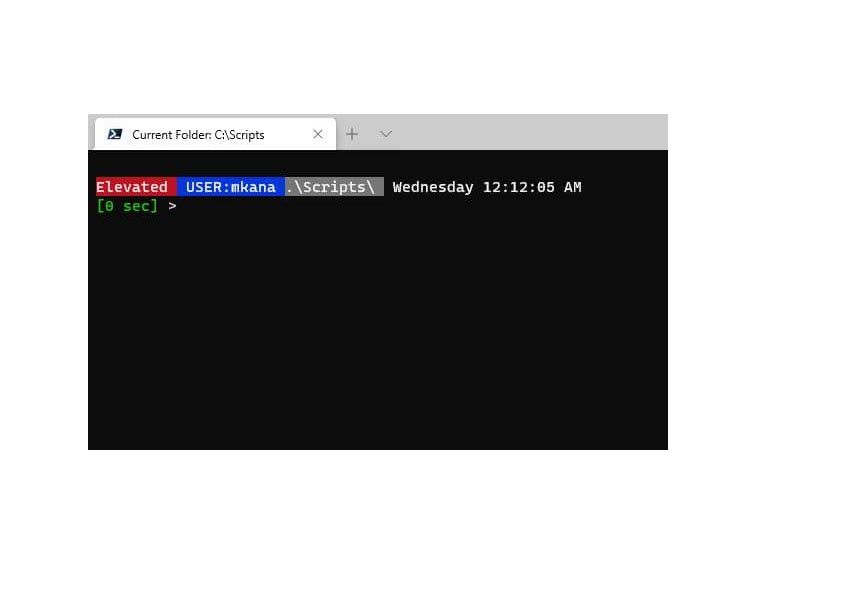
When I work on PowerShell scripts and commands, I have found there is a certain set of information that is beneficial for me to have at my fingertips. I like my PowerShell command prompt to give me information about my work environment. I customized my prompt so I don’t have to remember what directory I am in or if I am running as an administrator or not. Here’s what my personalized command prompt looks like:
I’ll be discussing six customizations in my command prompt. Let’s walk through each one and explain what they are. Before we get started, I just wanted to mention that I use the Windows Terminal for my prompt. It’s a modern app by Microsoft, designed for Windows 8 and newer versions, offering a clean interface, better performance, and compatibility with various Windows devices like PCs, tablets, and smartphones. If you’re into PowerShell, the Windows Terminal provides a tabbed interface to run multiple shell applications in one window. You can tweak the appearance, customize individual shell settings, and set up keyboard shortcuts. It supports PowerShell, Command Prompt, and WSL (Windows Subsystem for Linux), making it easy to switch between different setups effortlessly.
If you prefer not to use the Windows Terminal, you can still use the built-in PowerShell command prompts for PowerShell v7 and Windows PowerShell v5.x. All of my customizations will work in either the Windows Terminal or the PowerShell command prompts.
-
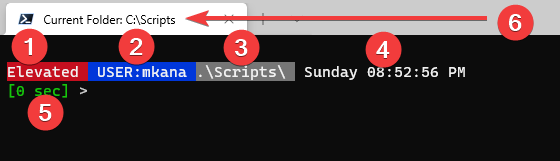
Item 1 displays if I am “running as administrator”. This is sometimes referred to as “Elevated” or not. It disappears for non-elevated users.
-
Item 2 displays the current user that the command prompt is running as. It’s helpful to know which user is logged in since I have multiple IDs for accessing resources.
-
Item 3 displays the current folder I am in. It only displays the folder; not the entire path.
-
Item 4 is the time when the last command prompt was completed; it is not a live display of the current time. It will display what the current time was when the previous command finished executing. I use this as a simple way to see what time I executed a command in the past.
-
Item 5 is the execution time (or runtime) of the last command. It displays the elapsed time in seconds or minutes, depending on how long the last command ran.
-
Item 6 shows the full path my command prompt is at. It shows the entire path.
I’m going to walk through each one of these items and show how each one is built. But before I can jump into the six items above, let’s talk about what executes these settings.
Customizing the Prompt function
The “Prompt” function configures the information displayed upon launching PowerShell. You can customize your command prompt by creating your own function called “Prompt” and saving your desired settings inside that function. You then add your “Prompt” function to your PowerShell profile and then your settings supersede the built-in prompt function.
The PowerShell profile is loaded every time you open a new command prompt and loads the code contained in your profile into memory. Once I cover all the individual pieces, I’ll show how to configure your profile to run your customized prompt function. But first, let’s get started going through the details of how to make the prompt look like my screenshot above.
Some information needed to customize the command prompt can be complex and difficult to understand at first glance. I’ll do my best to explain the code, but don’t get down if you struggle with some of these code snippets. I pulled some snippets directly from the Microsoft documentation. They don’t need any modification at all to be used. If you understand what they do at a higher level, then that is enough for you to use this code in your script.
Detecting Run As Administrator
Looking back at the earlier screen cap, the first piece of information displayed in the command prompt is if the command prompt is running “elevated”. Elevation of privileges is a concept where the logged-in user should run with the lowest set of privileges, and they elevate their privileges (rights) when they need to change the system. Microsoft controls elevating rights with User Access Control (aka UAC). If you want to change your local system from your PowerShell command prompt, then the PowerShell command prompt needs to be “elevated” (aka “Run As Administrator”) in order to make changes.
The choice to elevate happens when you start the command prompt. If you start your day like me by opening a PowerShell command prompt and leave it open for an extended period, you may not remember if you were running elevated or not. The code to check for elevation is written in .NET and taken from the Microsoft website. There are many uses of the same block of code online. The code checks the status of the identity that started the PS command prompt and reports if the identity is running under the “built-in administrator” role.
$IsAdmin: (New-Object Security.Principal.WindowsPrincipal ([Security.Principal.WindowsIdentity]::GetCurrent())).IsInRole([Security.Principal.WindowsBuiltinRole]::Administrator)
For all the code examples in this article, I save the results that I need to customize my command prompt to variables. I then assemble those variables later on with specific formatting to display the results as I wish. I am saving the result from the elevation query to a variable called $IsAdmin for later use. Oh, and FYI, this code snippet is the most challenging to grasp. They get easier to understand as we go on.
Displaying the Current User
I am reaching into .NET once again to find out what user is the command prompt running as. Don’t confuse this with the previous query. The first query was checking to see if the user who started the console chose to elevate (aka Run As Administrator). This bit of code is querying which user started the command prompt.
If you have multiple IDs or run multiple command prompts, this code helps you keep track of which user is using each prompt.
$CmdPromptUser: [Security.Principal.WindowsIdentity]::GetCurrent();
This snippet saves the current user of the console to a variable named $CmdPromptUser. I told you it would get easier. Let’s move on to the next piece of the puzzle.
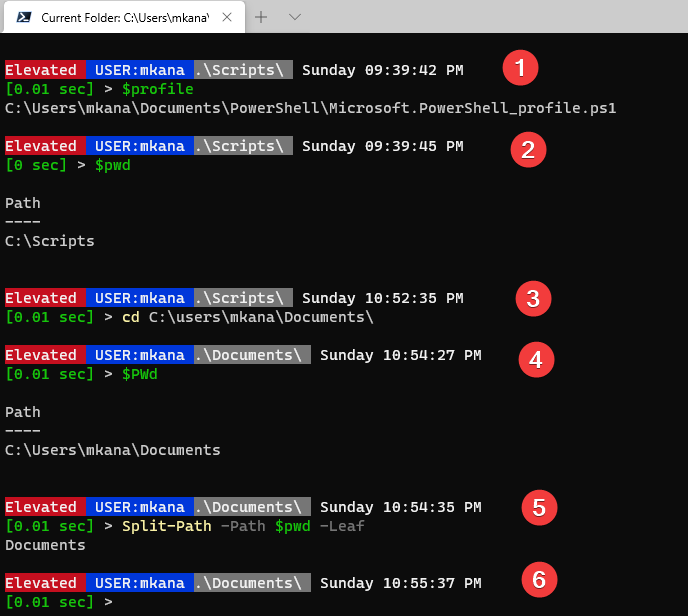
Displaying the Current Folder
I like to know what folder I am in, but displaying the full folder path inside my command prompt is problematic if I am working deep inside a set of nested folders. If I display the whole path, then my cursor may move all the way over to the right-most part of the console. By the time I type my commands, the line may wrap and make it difficult to read. I prefer to know the current folder I am in at all times, but I don’t need to know the whole path; just the folder’s name.
PowerShell has an automatic variable called $PWD. This variable shows the complete path of the current directory. You can split that path with the Split-Path cmdlet. I can use the -leaf parameter to display only the current folder. In the example below, I have switched to my documents directory.
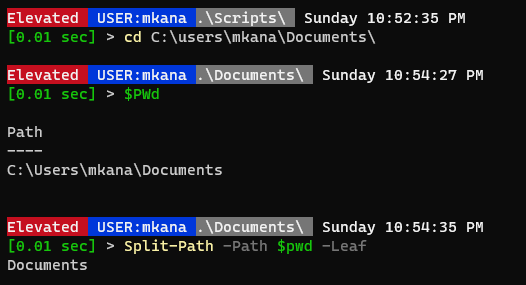
You can see that $PWD displays the full path. By using the -leaf switch, I get exactly what I need: the folder’s name only. I am saving the result to a variable named $CmdPromptCurrentFolder for later use.
$CmdPromptCurrentFolder: Split-Path -Path $pwd -Leaf
Creating a “timestamp” for commands
I often scroll back through my recent history to see commands I previously run. When I do that, I find it useful to have some sort of timestamp on my console that I can look back on and see approximately when commands were run. To do this, I display the current time when the previous command finished executing.
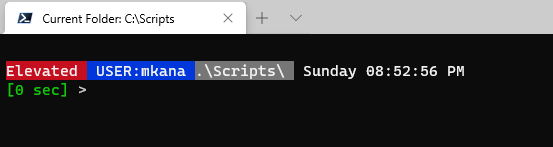
By enabling the timestamp tweak, I am able to view the timestamps of all my past commands on the screen while browsing through my history. You can see in the screenshot below that I executed examples for this article over the course of a few hours. The timestamp helps me understand the history of commands better.
To create a timestamp, execute Get-Date with specific formatting syntax and display the result on the screen. I am saving the result to a variable called $Date. Later on, I’ll show where to use the $Date variable in the output.
$Date: Get-Date -Format 'dddd hh:mm:ss tt'
Querying how long the last command ran
Another helpful piece of information is knowing how long the last command I executed took to run. For most commands, the result ranges between a few milliseconds and a few seconds in length. Occasionally, I will need to perform some queries that can run for multiple minutes before completing. Knowing how long a command took to run is helpful and helps set a realistic expectation if I have to run a command again.
To get the last command, I query the history using Get-History and then instruct PowerShell to run only the last command.
$LastCommand: Get-History -Count 1
The information available Get-History also includes how long a command took to run (execution time). If I run Get-History in PS7, I can use the duration property to show how long the last execution time was. But duration isn’t an available property in PS5. I use PS5 and PS7, and I would like my code to work in both environments.
I can do some math to calculate duration and know that it will work in PS5 & PS7. The execution time is determined by subtracting the start time from the end time. Both values are included in the history for PS5 and PS7; you just need to know how to access the properties. I am saving the result displayed in seconds to a variable named $RunTime because that is the best value for most commands I run.
$RunTime: ($lastCommand.EndExecutionTime - $lastCommand.StartExecutionTime).TotalSeconds
After we calculate the runtime, we can make the output look however we please. But, there is a special case we need to address: the initial launch of the console. In that situation, there is no “last command”. To account for that, I use an if loop to detect if there is a last command. If there is a last command, compute the run time. Otherwise do nothing. It might not be obvious in the code, but the if statement is testing true / false for $lastcommand. The command reads like this: “If $lastcommand exists (aka $true), calculate the value.”
if ($lastCommand) { $RunTime: ($lastCommand.EndExecutionTime - $lastCommand.StartExecutionTime).TotalSeconds }
As I mentioned before, sometimes I have commands that can take several minutes to finish. At some point, seconds become cumbersome when trying to understand length of time. For instance, mentally converting 286 seconds to 4 minutes and 46 seconds is an arduous task. But we can design some code to convert seconds to minutes for long running queries.
In the syntax below, I am testing the total runtime. If it’s greater than 60 seconds, the code converts the seconds to minutes and seconds. If it’s not, then just display the time in seconds.
if ($RunTime -ge 60) {
    $ts: [timespan]::fromseconds($RunTime)
    $min, $sec: ($ts.ToString("mm\:ss")).Split(":")
    $ElapsedTime: -join ($min, " min ", $sec, " sec")
}
else {
    $ElapsedTime: [math]::Round(($RunTime), 2)
    $ElapsedTime: -join (($ElapsedTime.ToString()), " sec")
}
This block of code may seem daunting at first. Let me explain what is happening here. When I calculate the runtime of the last command from the start and end execution times, I get the value in seconds. but when the value is over 60, I am asking PowerShell create a time-span, because I want to display the time differently for that scenario.
My goal is to display the time in minutes and seconds. Since I start with seconds, I need to convert seconds to minutes and seconds and a time-span object does the work for me.
$ts

Days              : 0
Hours             : 0
Minutes           : 1
Seconds           : 1
Milliseconds      : 11
Ticks             : 610119692
TotalDays         : 0.000706157050925926
TotalHours        : 0.0169477692222222
TotalMinutes      : 1.01686615333333
TotalSeconds      : 61.0119692
TotalMilliseconds : 61011.9692
However, what I want to display is a string of text that prints the time on the screen, not actual time output. I have to convert the time-span to a string.
 $ts.ToString()
00:01:01.0119692
Now I have a string version of the time. But I only want minutes and seconds. I can get just the minutes and seconds by going one step further.
$ts.ToString("mm\:ss")
01:01
Now I have the time in minutes in seconds as a string. But I am still not done. I want to final output to look like this: [01 min 01 sec] . To do that, I need to split apart the time value into separate variables so I can append text in between. That happens with this line.
$min, $sec: ($ts.ToString("mm\:ss")).Split(":")
The line above splits the time 01:01 into two variables: $min and $sec. I can do that in one line by using the .split property and specify what to split on .Split(":"). PowerShell then deposits the two values into the two variables I specified. Now that I have two variables, I am using a -join statement to join the variables and some text to produce the output I desire [01 min 01 sec] . It seems like a bunch of code for a simple result, but I think the effort is worth the result.
if ($RunTime -ge 60) {
    $ts: [timespan]::fromseconds($RunTime)
    $min, $sec: ($ts.ToString("mm\:ss")).Split(":")
    $ElapsedTime: -join ($min, " min ", $sec, " sec")
}
Displaying the full folder path in the Title Bar
Earlier, I mentioned that I only wanted the current folder name I am working in to be displayed in my PS command prompt. However, I also realize the value of seeing the whole path. That’s why I stuck the full path in the title bar of the window to use as a reference that is out of the way but easy to find when I need it. You may prefer something different. The title bar has its own built-in variable $host.ui.RawUI.WindowTitle , I simply have to set it to my preference. I have added the words “Current Folder: " and the $pwd variable.
$host.ui.RawUI.WindowTitle: "Current Folder: $pwd"
Bringing it all together
Let me show you how I brought the data together and formatted the output. Let’s review, we have seven variables containing data: $IsAdmin,$CmdPromptUser,$CmdPromptCurrentFolder,$Date, $LastCommand, $RunTime, and $host.ui.RawUI.WindowTitle . What we need now is to display the data and format it to our preferences. Here’s the code for the formatting:
#Decorate the CMD Prompt
Write-Host ""
Write-Host ($(if ($IsAdmin) { 'Elevated ' } else { '' })) -BackgroundColor DarkRed -ForegroundColor White -NoNewline
Write-Host " USER:$($CmdPromptUser.Name.split("\")[1]) " -BackgroundColor DarkBlue -ForegroundColor White -NoNewline
If ($CmdPromptCurrentFolder -like "*:*")
        {Write-Host " $CmdPromptCurrentFolder "  -ForegroundColor White -BackgroundColor DarkGray -NoNewline}
        else {Write-Host ".\$CmdPromptCurrentFolder\ "  -ForegroundColor White -BackgroundColor DarkGray -NoNewline}
Write-Host " $date " -ForegroundColor White
Write-Host "[$elapsedTime] " -NoNewline -ForegroundColor Green
return "> "
Many articles emphasize the drawbacks of using the Write-Host cmdlet to display data. The reason is that data displayed with Write-Host is not reusable and can only be seen on the screen. In our script, we’re only using the data for display, so Write-Host or its newer version Write-Output is acceptable to use. That block of code is probably confusing, so let’s walk through each line and explain what is happening.
I am starting the formatting with a return of a blank line, this provides a little visual break from any previous commands. Next comes the formatting for the “elevated” information.
If the command prompted is elevated, then it will display the word “Elevated” with a red background. If it is not elevated, then nothing displays. The if/else statement controls this. I use the -NoNewLine parameter at the end because I want to display the bits of information next to each other on the same line.
Write-Host ""
Write-Host ($(if ($IsAdmin) { 'Elevated ' } else { '' })) -BackgroundColor DarkRed -ForegroundColor White -NoNewline
Next is the formatting for displaying the current user info. I added the text “User: " to the output and use the .split property to get rid of the domain name and the slash. I have formatted this text with a blue background and once again use the -NoNewLine property to prevent a line break.
Write-Host " USER:$($CmdPromptUser.Name.split("\")[1]) " -BackgroundColor DarkBlue -ForegroundColor White -NoNewline


<br>

The next line displays the current folder. I spent a long time trying different color combinations and settled on Grey. I have added in some slashes to make the output look like a folder path. Once again, `-NoNewLine` is used to prevent a line break. By using `-NoNewLine` on this line of code along with the two previous lines, I have kept the red, blue and grey blocks of text on one line.

```PowerShell
Write-Host ".\$CmdPromptCurrentFolder\ "  -ForegroundColor White -BackgroundColor DarkGray -NoNewline
The last bit of information on the first line of text is the timestamp. This time I do not use the -NoNewLine property because I now want to start a new line after displaying the $date variable. Remember that I formatted the date to my preference when I saved the variable.
Write-Host " $date " -ForegroundColor White
The last piece of information being displayed is the $ElapsedTime variable. I added some simple formatting with brackets around the variable to make the output standout on the line. The last line starts with return and then displays the > symbol. The word return is a built-in function that tells the computer to exit the function. This is necessary so we can type at the command prompt and have it process the text as cmdlets and not as part of our function.
Write-Host "[$elapsedTime] " -NoNewline -ForegroundColor Green
return "> "
That covers all the individual pieces of the console customizations I used to configure the console prompt as I wish. Below, you’ll find the complete script. You can add the script to your profile and when you launch PowerShell, you should have a customized command prompt.
f you’re reading this post in a RSS reader, then you may not see the script listed at the bottom of the article in your feed. The script is an embedded link to a GitHub gist. If you can’t see the script, then visit the post on my website and the script will be listed at the bottom.
If you want to see how I implemented this across multiple profiles, then look at the follow-up article which dives into where to save the code and how to have one customized profile for all users AND for BOTH PowerShell5 and PowerShell7. It walks you through the setup process in great detail.
function prompt {

    #Assign Windows Title Text
    $host.ui.RawUI.WindowTitle = "Current Folder: $pwd"

    #Configure current user, current folder and date outputs
    $CmdPromptCurrentFolder = Split-Path -Path $pwd -Leaf
    $CmdPromptUser = [Security.Principal.WindowsIdentity]::GetCurrent();
    $Date = Get-Date -Format 'dddd hh:mm:ss tt'

    # Test for Admin / Elevated
    $IsAdmin = (New-Object Security.Principal.WindowsPrincipal ([Security.Principal.WindowsIdentity]::GetCurrent())).IsInRole([Security.Principal.WindowsBuiltinRole]::Administrator)

    #Calculate execution time of last cmd and convert to milliseconds, seconds or minutes
    $LastCommand = Get-History -Count 1
    if ($lastCommand) { $RunTime = ($lastCommand.EndExecutionTime - $lastCommand.StartExecutionTime).TotalSeconds }

    if ($RunTime -ge 60) {
        $ts = [timespan]::fromseconds($RunTime)
        $min, $sec = ($ts.ToString("mm\:ss")).Split(":")
        $ElapsedTime = -join ($min, " min ", $sec, " sec")
    }
    else {
        $ElapsedTime = [math]::Round(($RunTime), 2)
        $ElapsedTime = -join (($ElapsedTime.ToString()), " sec")
    }

    #Decorate the CMD Prompt
    Write-Host ""
    Write-host ($(if ($IsAdmin) { 'Elevated ' } else { '' })) -BackgroundColor DarkRed -ForegroundColor White -NoNewline
    Write-Host " USER:$($CmdPromptUser.Name.split("\")[1]) " -BackgroundColor DarkBlue -ForegroundColor White -NoNewline
    If ($CmdPromptCurrentFolder -like "*:*")
        {Write-Host " $CmdPromptCurrentFolder "  -ForegroundColor White -BackgroundColor DarkGray -NoNewline}
        else {Write-Host ".\$CmdPromptCurrentFolder\ "  -ForegroundColor White -BackgroundColor DarkGray -NoNewline}

    Write-Host " $date " -ForegroundColor White
    Write-Host "[$elapsedTime] " -NoNewline -ForegroundColor Green
    return "> "
} #end prompt function

